In this article: How to open the settings menu on a MOD Monochrome Display and return each setting to the correct default for your bike.
⚠️ Note: These values are programmed at the factory for your bike’s motor, battery, and wheel size. Wrong values can cause inaccurate speed or battery readings, unexpected pedal assist behavior, error codes, or damage to electrical components.
This Article Applies to the Following Bikes
Difficulty
★☆☆ Easy
Estimated Time
10–15 Min
Jump to a Section
Before You Start
Tools you will need
- No tools are required.
Preparation
- Park the bike securely on its kickstand.
- Power on the bike’s display.
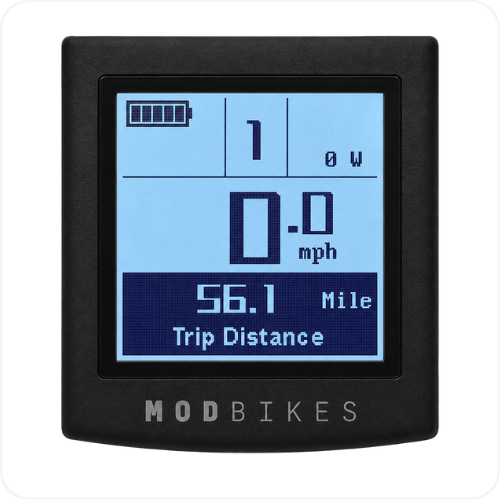
How to Access the Settings Menu
- Power on the display by pressing and holding the "i" button for approximately two seconds.
- Press and hold the "+" and "–" buttons simultaneously for approximately two seconds.
- Use the "+" and "–" buttons to move through the available settings and to change the value of a setting.
- Press the "i" button to select, enter, or save a setting.
- To exit the settings menu, press and hold the "i" button for approximately two seconds.
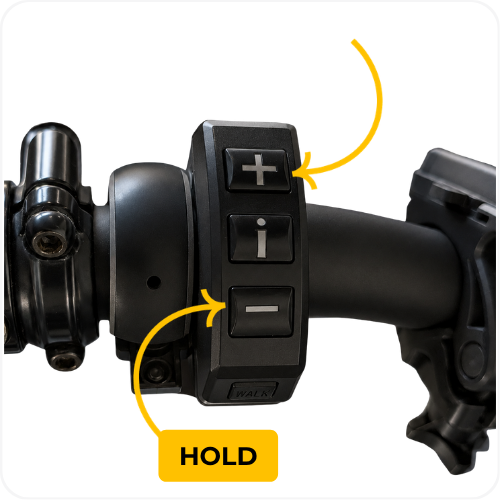
⚠️ Note: When the home screen is displayed, holding the "i" button will power off the display.
Quick Reference by Model
If you already know your way around the menu, use these values to correct a setting without reading the rest of the article. Each setting is explained in full below.
MOD City+
MOD Easy and MOD Groove
MOD Berlin and MOD Black
Settings
These eight settings appear on every monochrome display:
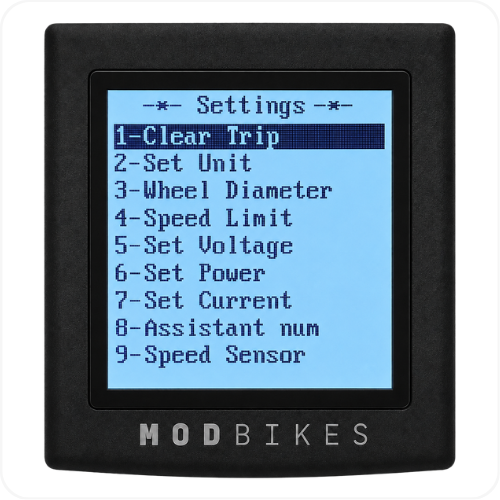
- Clear Trip
- Set Unit
- Wheel Diameter
- Speed Limit
- Set Voltage
- Set Power
- Set Backlight
- Set PIN (Password)
Some models also have Set Current, Assistant Number, and Speed Sensor. These do not appear on the MOD Berlin or MOD Black. There is also a Set SCA Value sub-menu inside Set Power on some software versions.
Clear Trip
Resets the current trip distance without affecting the bike’s lifetime odometer.
Instructions
- Navigate to Clear Trip.
- Select YES to reset the trip meter, or NO to keep the current trip distance.
- Press the "i" button to save.
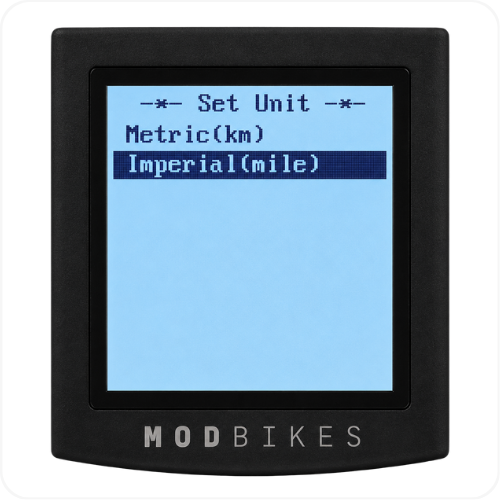
Set Unit
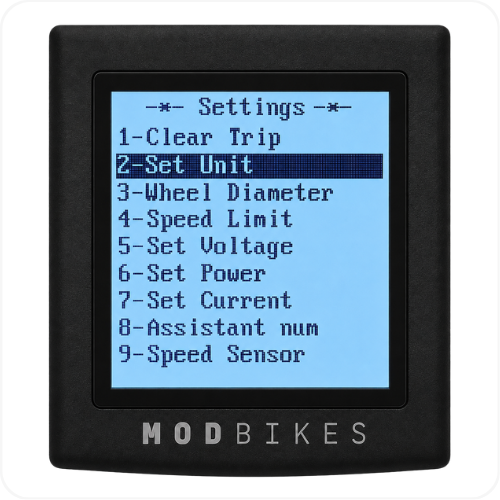
Sets whether the display shows speed and distance in miles (MPH) or kilometers (KM/H).
Instructions
- Navigate to Set Unit.
- Select Metric (km) or Imperial (mile).
- Press the "i" button to save.
Menu location:
Recommended setting: Match your local preference.
Wheel Diameter
Tells the controller your wheel size. This affects both the speedometer and the odometer.
Instructions
- Navigate to Wheel Diameter.
- Select the default for your model.
- Press the "i" button to save.
Menu location:
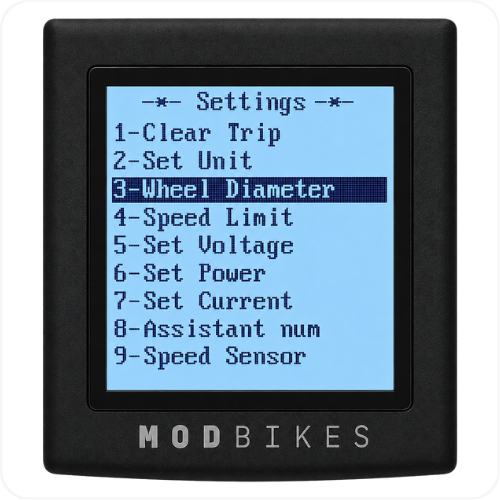
Defaults by model:
- MOD City+ → 20 inch
- MOD Easy and MOD Groove → 24 inch
- MOD Berlin and MOD Black → 700C
⚠️ Important: Use the default for your model. Any other value will throw off your speed and distance readings.
The menu offers 16 through 26 inch, 700C, and 28 inch. The tires on the MOD Berlin and MOD Black are larger than the biggest option available, so 700C is used as the closest match. If your speed readings still look off on either of these models, 28 inch is also approved and some riders find it more accurate.
Speed Limit
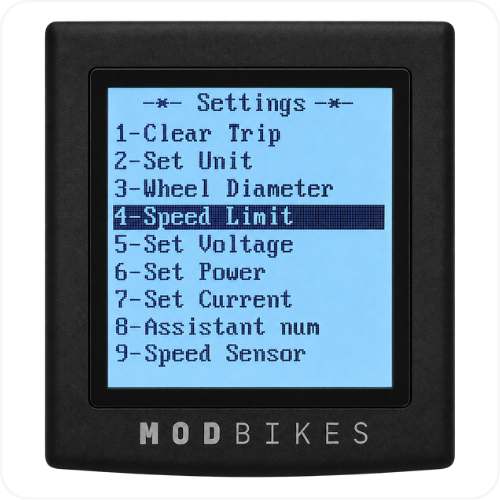
Sets the maximum assisted speed the controller will allow.
Instructions
- Navigate to Speed Limit.
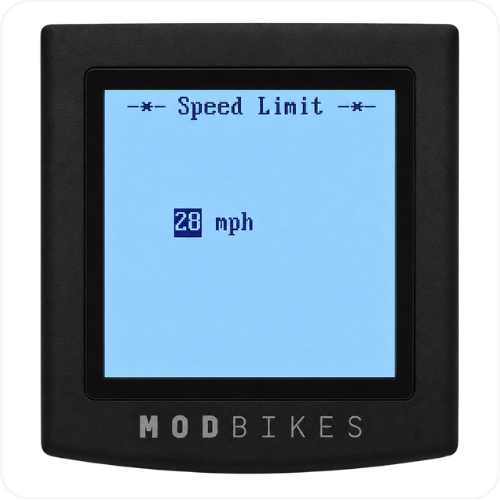
- Select your desired speed limit. The maximum is 28 mph.
- Press the "i" button to save.
Menu location:
⚠️ Important: Do not set this above your bike’s factory specification of 28 mph. The controller only provides pedal assist up to the programmed limit.
Factory value:
Set Voltage
Calibrates the battery level shown on the display.
Instructions
- Navigate to Set Voltage.
- Verify the following factory values:
- 40.0V
- 42.0V
- 44.0V
- 46.0V
- 48.0V
- Press the "i" button to save.
Menu location:
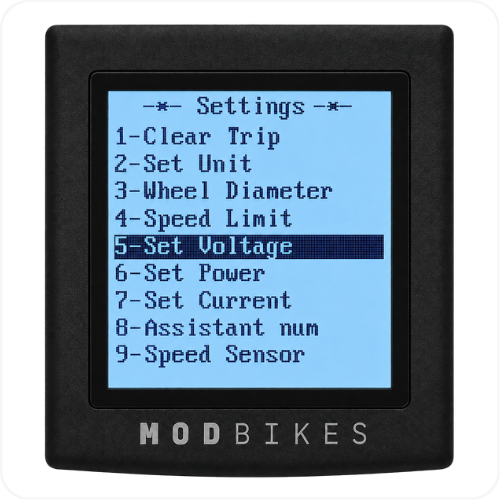
⚠️ Important: Any other values will cause inaccurate battery level readings.
Factory values:
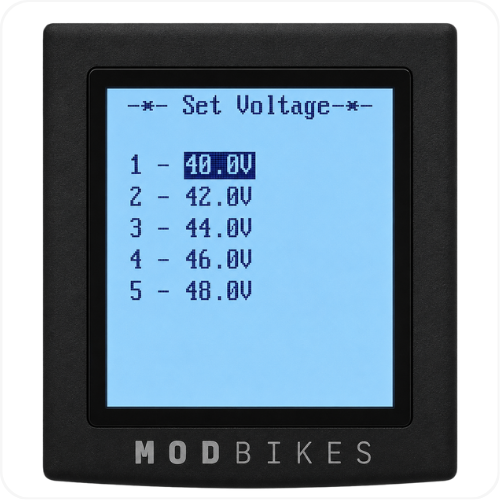
Set Power
Sets the pedal assist levels available while you ride. Press + or – on the display to move up and down through them. We recommend [3: 0-5].
The two digits after the colon control different things:
- First digit — whether you get a no-assist level. 0 gives you a zero level, so you can pedal with no assist at all and select that from the main screen. 1 means there is always some assist, with the minimum being whatever SCA level 1 is set to.
- Second digit — how many assist levels you can choose from. 5 gives you five levels, each set to its own percentage of motor assistance. A higher number adds more levels in between for finer control.
Instructions
- Navigate to Set Power.
- Select [3: 0-5].
- Press the "i" button to confirm. Depending on your software version, the display either shows OK! and accepts the preset percentages, or it opens the Set SCA Value sub-menu described below.
Menu location:
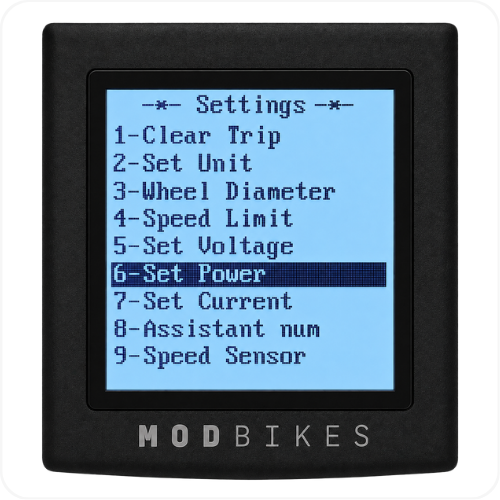
Recommended value: [3: 0-5]
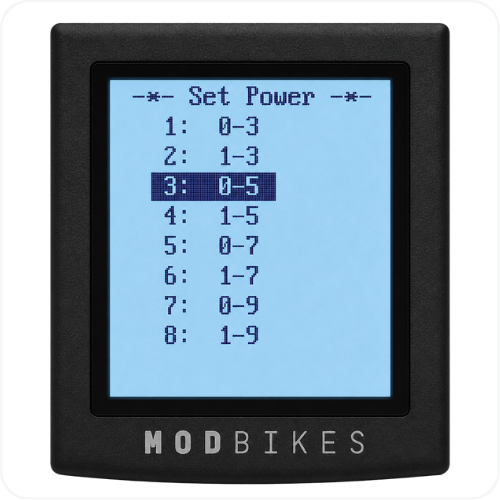
Set SCA Value
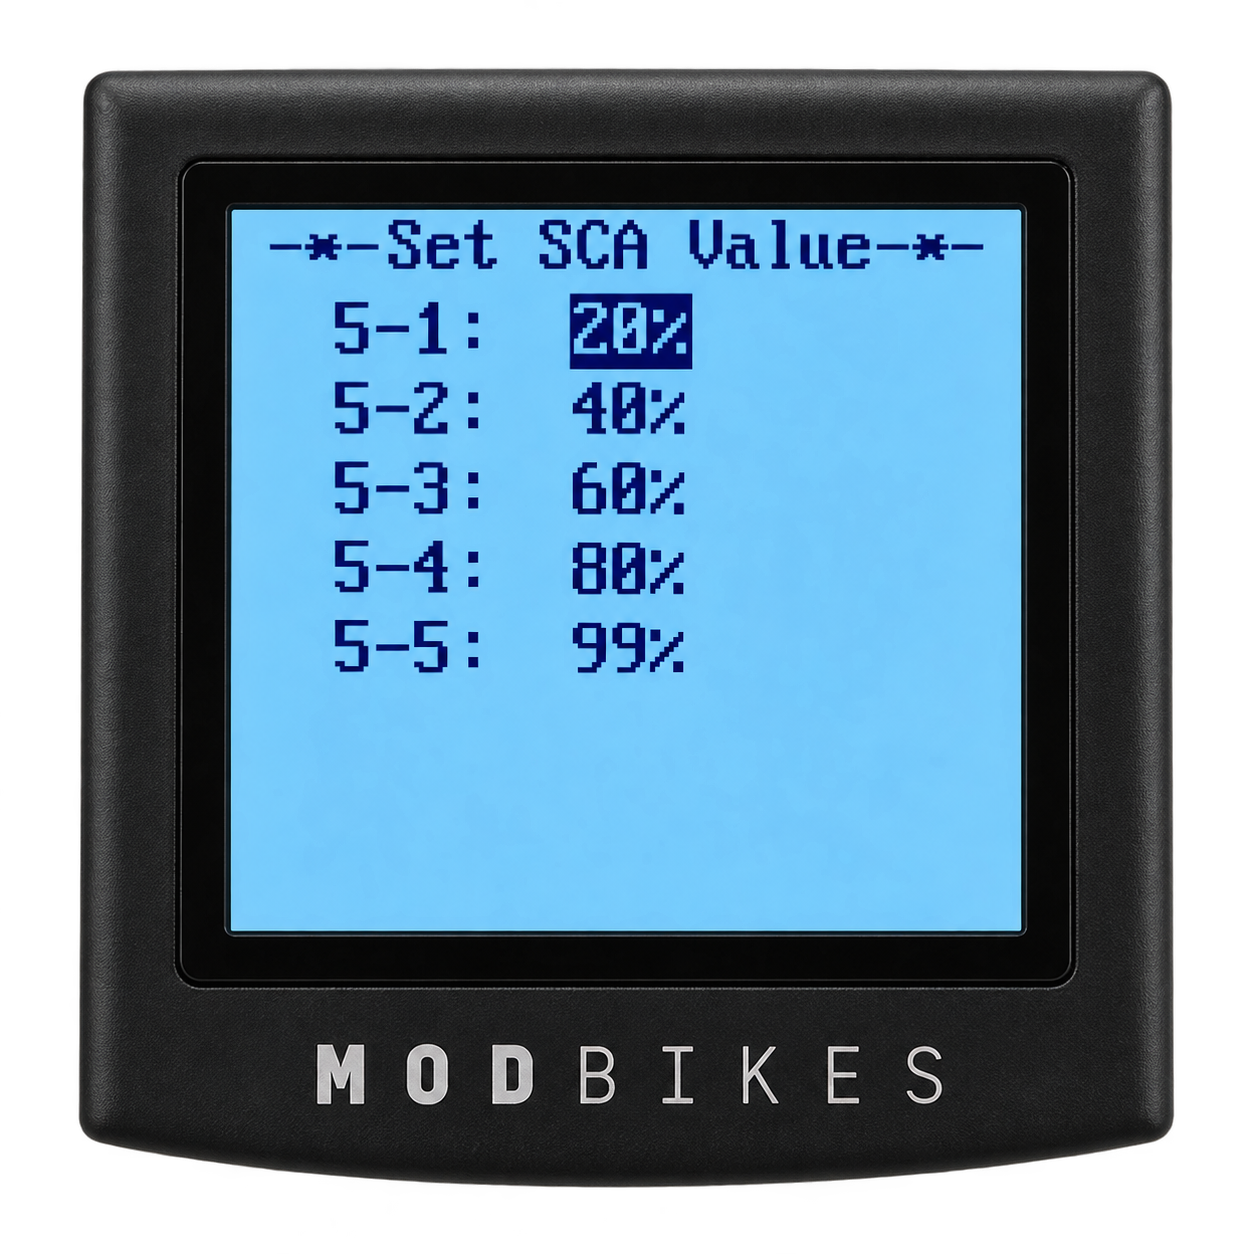
This is a sub-menu inside Set Power, not a separate item in the settings list. On some displays it opens after you confirm your Set Power selection and lets you set the percentage of motor assistance for each individual assist level.
⚠️ Note: Whether this sub-menu appears depends on your display’s software version rather than your bike model. If your display shows OK! after you confirm Set Power, your version uses the preset percentages and there is nothing to adjust. This is not a fault.
Default values for 0-5 and 1-5:
- 5-1 → 20%
- 5-2 → 40%
- 5-3 → 60%
- 5-4 → 80%
- 5-5 → 99%
If the sub-menu opens, use + and – to adjust the highlighted level, then press the "i" button to save.
Set Current
Sets the maximum current the controller delivers to the motor. Current determines how much power the motor can draw, which is what you feel as acceleration.
- More current → more power and stronger acceleration, with reduced range.
- Less current → more range, with softer acceleration and less power.
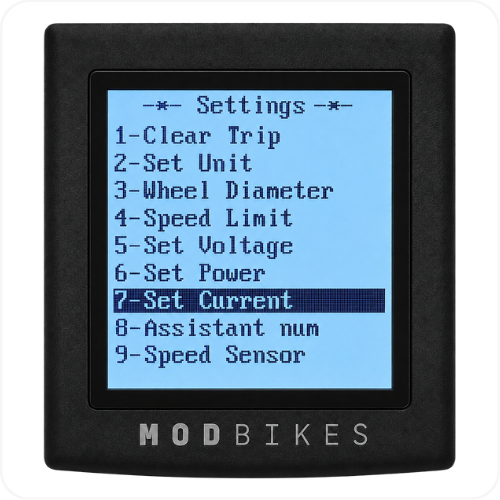
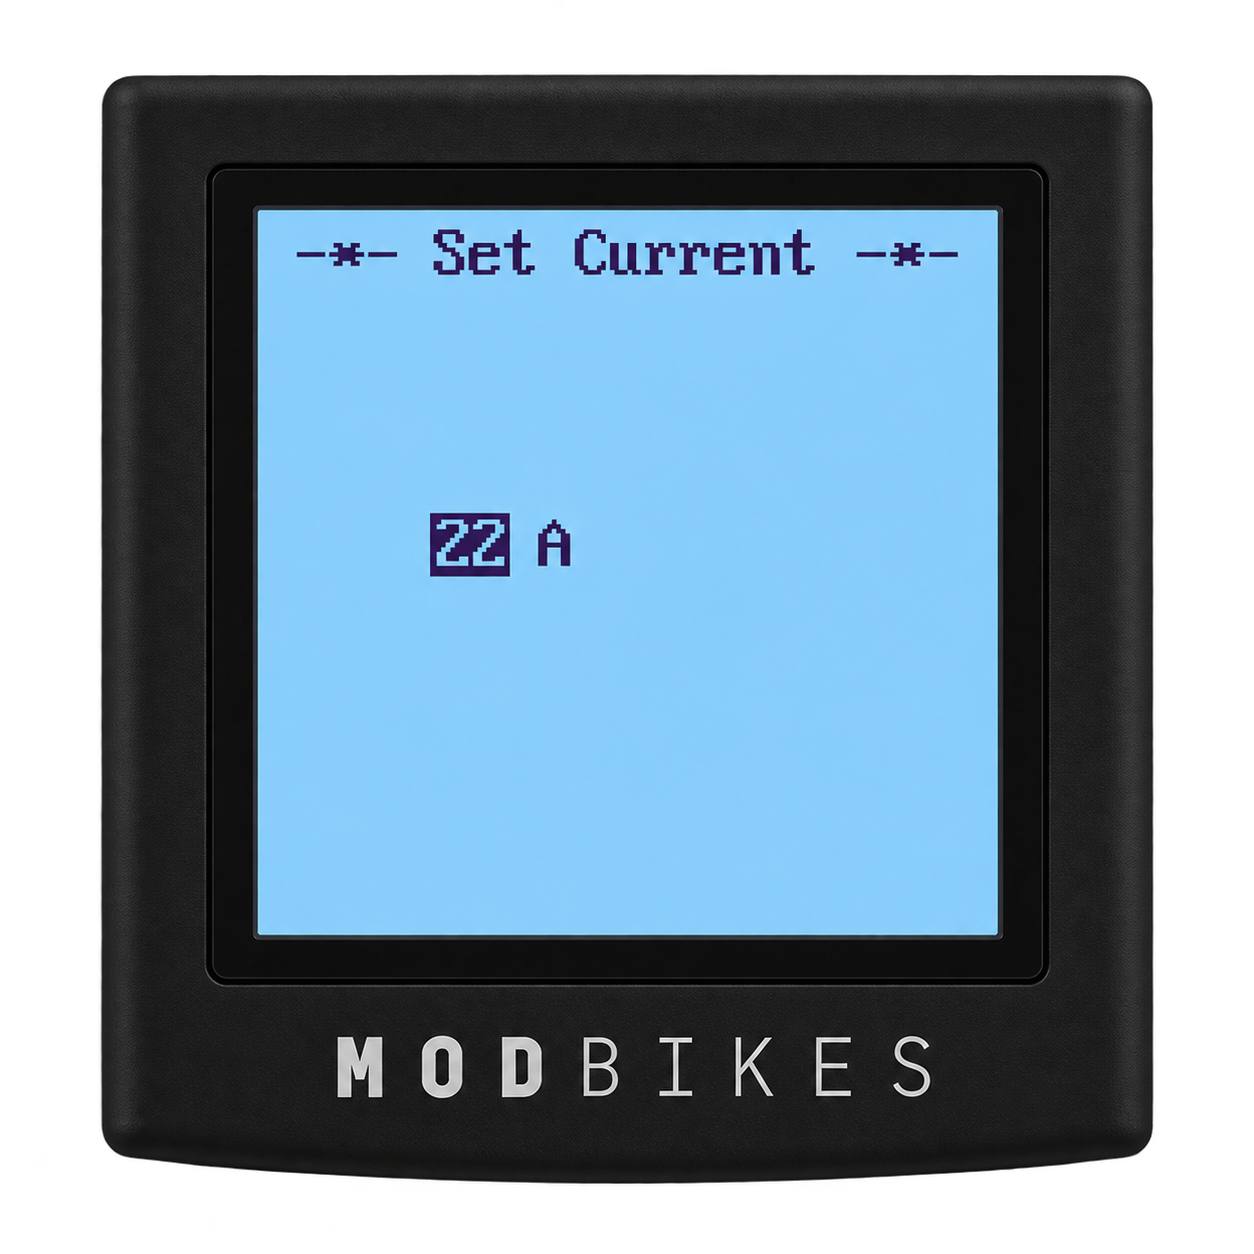
Values range from 10A to 30A. The factory default is 17A, and we recommend 22A.
⚠️ Note: This menu is only available on some models. It does not appear on the MOD Berlin or MOD Black.
Instructions
- Navigate to Set Current.
- Set the value to 22A, or lower if you want more range.
- Press the "i" button to save.
Menu location:
Recommended setting: 22A
Assistant Number
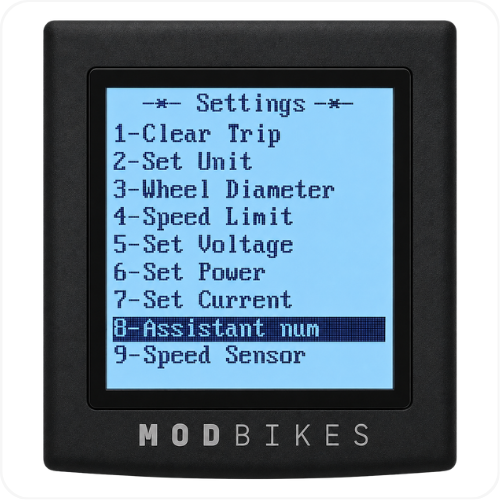
Controls how far the pedals turn before pedal assist engages. The two options are 12 and 6.
⚠️ Note: This menu is only available on some models. It does not appear on the MOD Berlin or MOD Black.
Instructions
- Navigate to Assistant Number.
- Select 12 or 6.
- Press the "i" button to save.
Menu location:
Setting shown:
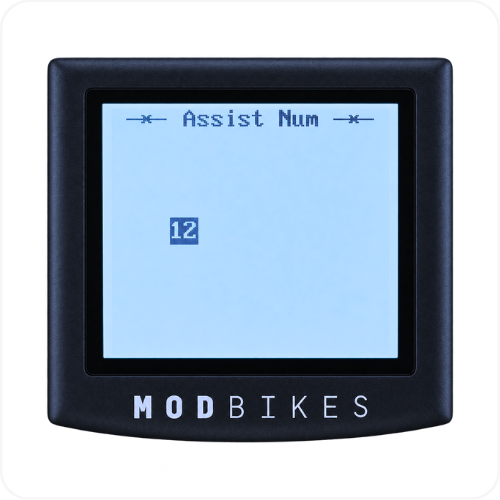
Both values are valid, so this one comes down to feel. If assist lags when you start pedaling, switch to the other option. If it engages sooner than you want, switch back.
Speed Sensor
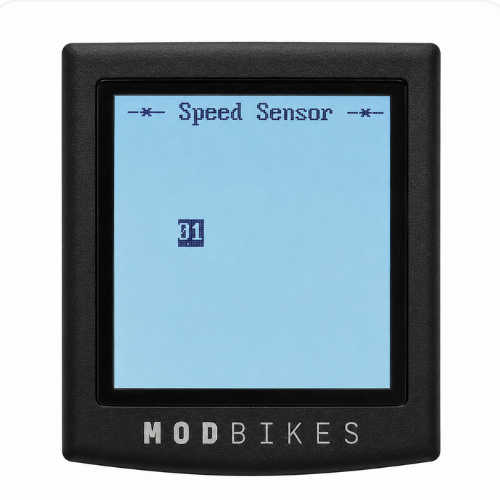
Matches the number of magnets inside your motor. The two options are 1 and 6.
There is no way to tell which one your motor uses by looking at it, and a mismatch in either direction makes the speedometer read wildly off. Only change this setting if you are having speedometer problems.
⚠️ Note: This menu is only available on some models. It does not appear on the MOD Berlin or MOD Black.
Instructions
- Navigate to Speed Sensor.
- If your speedometer is reading far off, switch to the other value.
- Press the "i" button to save. Then ride a short distance and check the reading again.
Menu location:
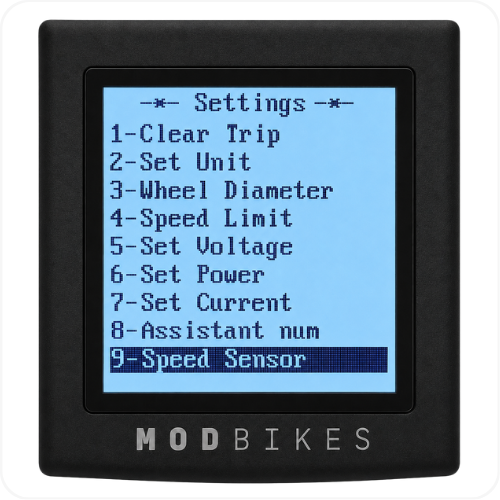
Setting shown at 01:
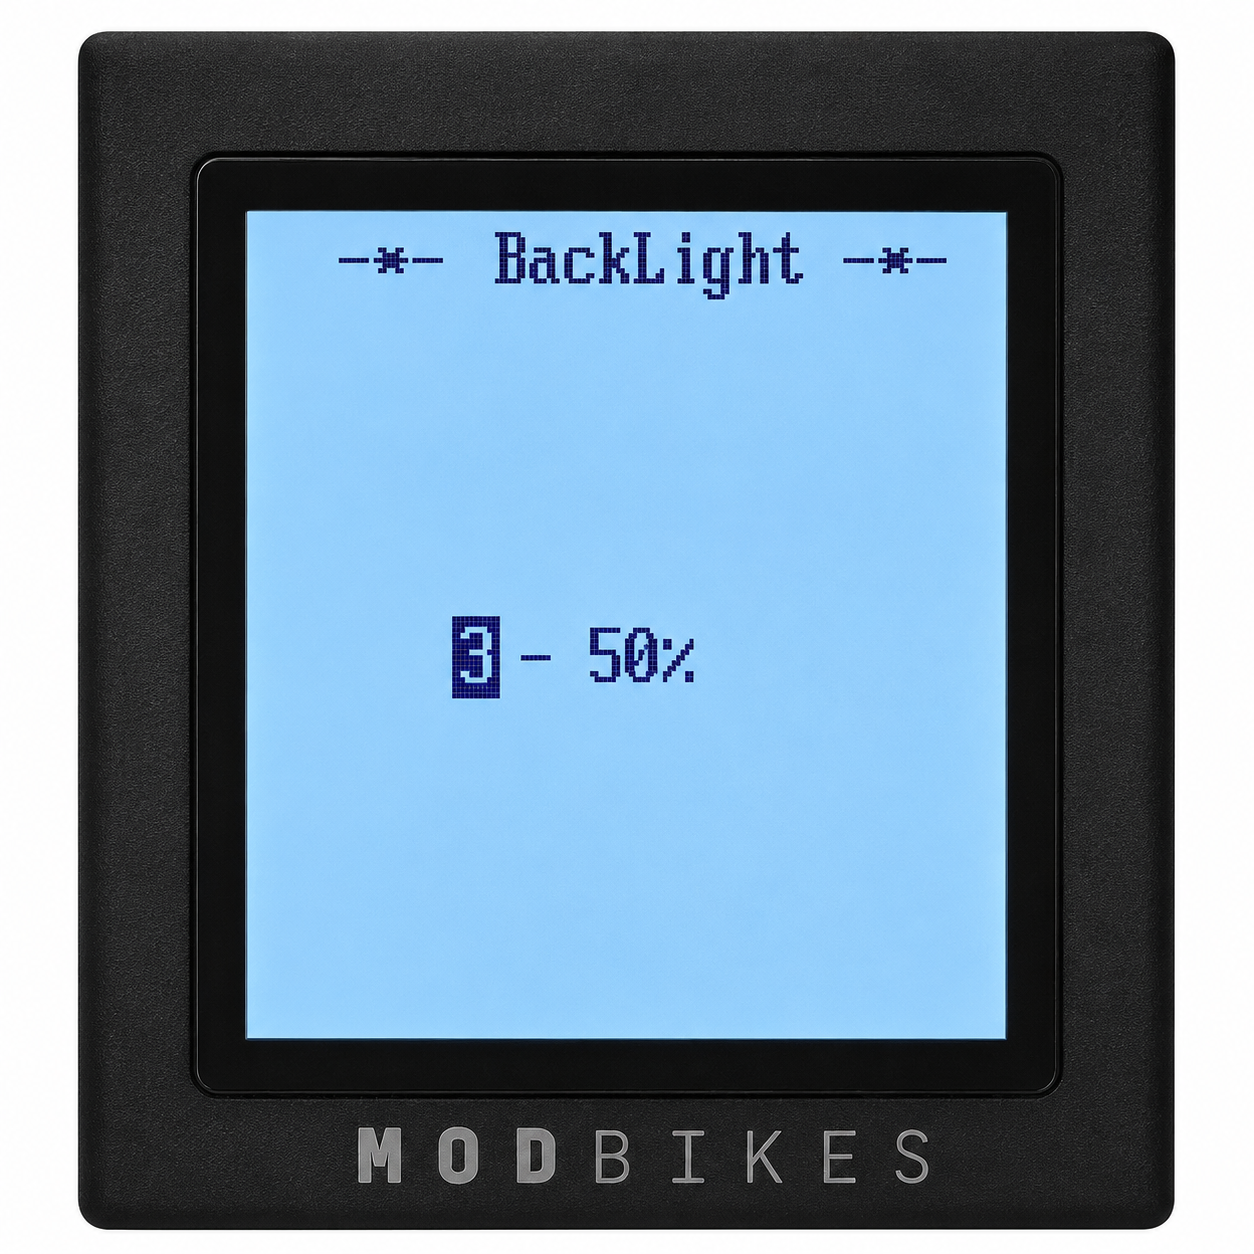
Set Backlight
Changes the brightness of your display. Higher values improve visibility in daylight.
Instructions
- Navigate to Set Backlight.
- Choose your display value.
- Press the "i" button to save.
Menu location:
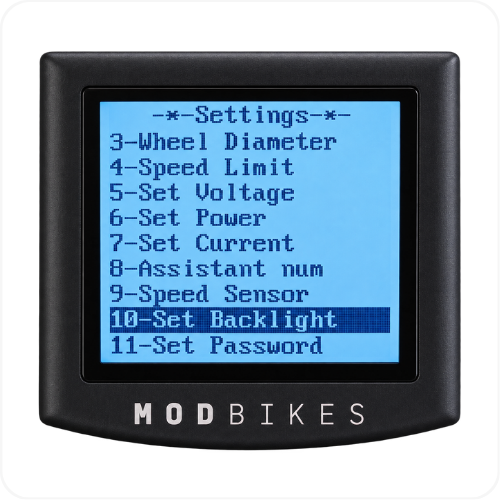
Factory default value: 50%
Set PIN (Password)
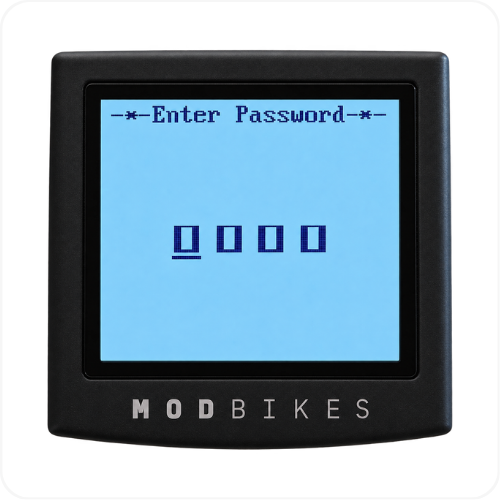
Changes or disables the display security PIN. The factory default is 1212.
Instructions
- Navigate to Set PIN.
- Enter the current PIN.
- Enter a new PIN, or leave the default.
- Press the "i" button to save.
Menu location:
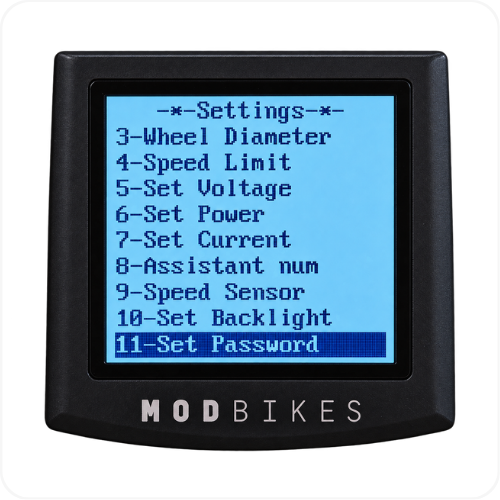
Factory default PIN: 1212
⚠️ Important: Write your new PIN down and keep it somewhere safe. A forgotten PIN cannot be reset remotely. The display has to come off the bike and be shipped to MOD BIKES, or brought into our garage if you are local, which costs money and takes time.
Troubleshooting
- The display shows the wrong speed → Check Set Unit and Wheel Diameter first. If both are correct for your model, the Speed Sensor value may not match your motor.
- Speed is slightly off on a MOD Berlin or MOD Black → Try 28 inch instead of 700C. Both are approved for these two models.
- The battery indicator is inaccurate → Verify that the voltage thresholds are set to 40.0, 42.0, 44.0, 46.0, and 48.0.
- Pedal assist feels too strong or too weak → Check Set Power, Set SCA Value, and Set Current against the values in this article.
- You cannot pedal without assist → Set Power is starting at 1 instead of 0. Change it to 0-5 to get a no-assist level.
- You never see the Set SCA Value screen → After you confirm your Set Power selection, some software versions show OK! and apply the preset percentages instead of opening the sub-menu. This is normal.
- Pedal assist lags when you start pedaling → Switch the Assistant Number to the other value, 12 or 6.
- The bike accelerates too quickly → Lower the Set Current value. A setting between 12A and 14A gives a softer response and more range.
- The display asks for a PIN → Enter the default PIN, 1212, unless it was changed.
- The PIN does not work → Confirm each number before moving to the next field. If the PIN was changed and cannot be remembered, the display has to be sent to MOD BIKES for a reset.
- The display shows an error after settings were changed → Stop riding and restore the values listed in this article.
- The settings menu will not open → Turn the display on, then press and hold the "+" and "–" buttons simultaneously for approximately two seconds.
- A menu option looks different from this guide → Confirm that the bike has the monochrome display. Color displays use a different settings system.
- A setting in this guide is missing from your display → Set Current, Assistant Number, and Speed Sensor do not appear on every model, including the MOD Berlin and MOD Black.
FAQs
- Are the settings identical across MOD models?
Many are, including the battery voltage thresholds and the default PIN. Wheel diameter, pedal assist, and speed sensor values differ, and the MOD Berlin and MOD Black do not have the Set Current, Assistant Number, or Speed Sensor menus at all. Always use the values for your model. - Can I change the wheel diameter to correct my speed reading?
Only on the MOD Berlin and MOD Black, which may use either 700C or 28 inch. On every other model, use the listed default — any other value makes the readings worse, not better. - Can I lower the maximum speed?
Yes. The speed limit can be reduced for rider comfort or to comply with local regulations. - What should Set Current be set to?
We recommend 22A. The factory default is 17A, and the menu allows anything from 10A to 30A. Higher values increase power and battery drain; lower values increase range. - Can I change the Set Power value?
Yes. We recommend [3: 0-5]. Start the first digit at 0 if you want the option to pedal with no assist, or at 1 if you always want some assist. The second digit sets how many assist levels you can choose from while riding. - Can I change the assist percentage for each level?
On some displays, yes. After you confirm your Set Power selection, a Set SCA Value sub-menu may open where each level can be adjusted. Whether it appears depends on your software version rather than your bike model, so the same MOD model may offer it on one display and not another. The presets are 20%, 40%, 60%, 80%, and 99%. - What is the default display PIN?
1212. - What if I forget my PIN?
There is no remote reset. The display has to be removed from the bike and sent to MOD BIKES, or brought into our garage if you are local. It costs money and takes time, so keep your PIN somewhere safe. - Why does the display show a different battery level than the battery itself?
The display and battery use different metering systems, so readings may vary slightly. The indicator on the battery is the more direct reading. - What should I do if I changed a setting by accident?
Use the values in this article to restore it. Do not ride the bike if the display shows an error or the motor behaves unexpectedly.
Warning
⚠️ Important Safety & Liability Notice

Some display settings are manufacturer-programmed and should not be changed. Incorrect wheel diameter, voltage, power, current, pedal assist, or speed sensor settings may cause inaccurate readings, unexpected motor behavior, error codes, component damage, loss of control, injury, or death.

After restoring the settings, test the bike in a safe, open area at a low pedal assist level before returning to normal riding. If the bike displays an error code or behaves unexpectedly, stop riding and contact MOD BIKES Support.

MOD BIKES is not liable for damage, injury, or loss caused by unauthorized programming, incorrect settings, modifications, or failure to follow these instructions. Local laws and regulations may apply.
Was this article helpful?
That’s Great!
Thank you for your feedback
Sorry! We couldn't be helpful
Thank you for your feedback
Feedback sent
We appreciate your effort and will try to fix the article