In this article: You’ll learn how to safely remove and remount your MOD BIKE wheels. These steps apply to both front and rear wheels and will help you perform maintenance, fix a flat, or prepare your bike for transport.
⚠️ Warning: Removing and remounting the rear wheel is a more advanced task. It’s mechanically closer to working on a motorcycle than a standard bicycle. If you’re not fully confident in your mechanical skills, we recommend taking your bike to a professional shop or contacting MOD Support for assistance.
This Article Applies to the Following Bikes
Difficulty
★★☆ Medium
Estimated Time
15 - 30 Min
Before You Start
Tools you will need
- Adjustable Wrench (included in your bike tool kit)
- Multitool with Allen Wrenches (included in your bike tool kit)
- Bolt Tray (or any small container for screws)
- Zip-ties
- 21 mm socket wrench – for removing and tightening rear axle nuts (MOD Easy)
- 18 mm socket wrench – for removing and tightening rear axle nuts (MOD City+)
- 10 mm wrench
- Cable snipers or scissors
- Towels or rags
Preparation
- Power off the bike
- Work on a flat, stable surface with good lighting and enough space to move around the bike.
- Ensure brakes are released before removing or remounting any wheel to avoid rotor contact.
- If you have a MOD Easy Sidecar, you must detach the sidecar from its mounting plate before flipping the bike. You can leave the mounting plate attached, but the sidecar itself must be removed — otherwise, you won’t be able to safely flip or service the bike.
Steps to Remove Wheels
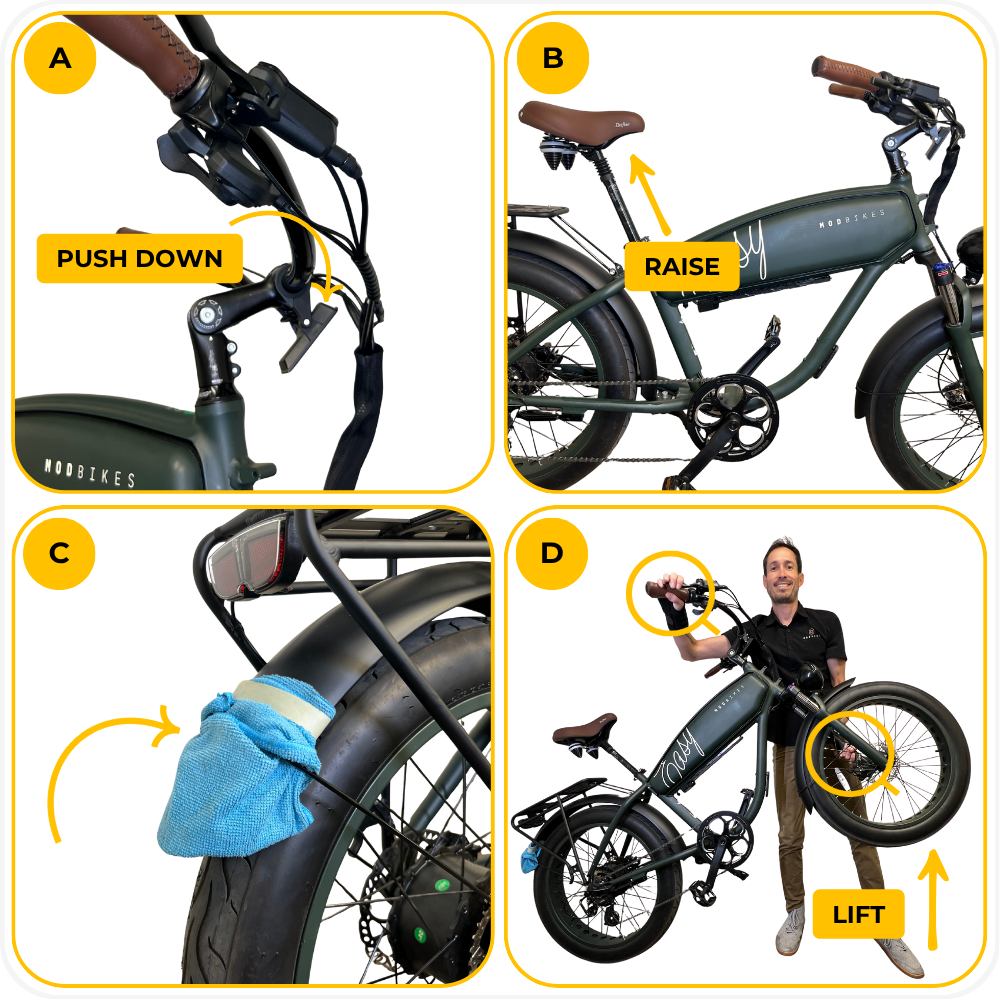
Step 1: Flip the Bike
Push the display forward and down so it won’t touch the ground when flipped.
Raise the seatpost as high as possible so that the seat is level with the handlebars—this helps the bike rest evenly once flipped.
Cover the rear section of the rear fender with a rag or towel to prevent scratches during the flip.
Stand on the left side of the bike. With your left hand, hold the left front fork. With your right hand, squeeze the rear brake lever to keep the bike from rolling backward. Lift the front wheel.
Release the rear brake, and start to rotate the bike backwards.
Continue the motion to set it down carefully until the bike rests fully on the seat and handlebars.
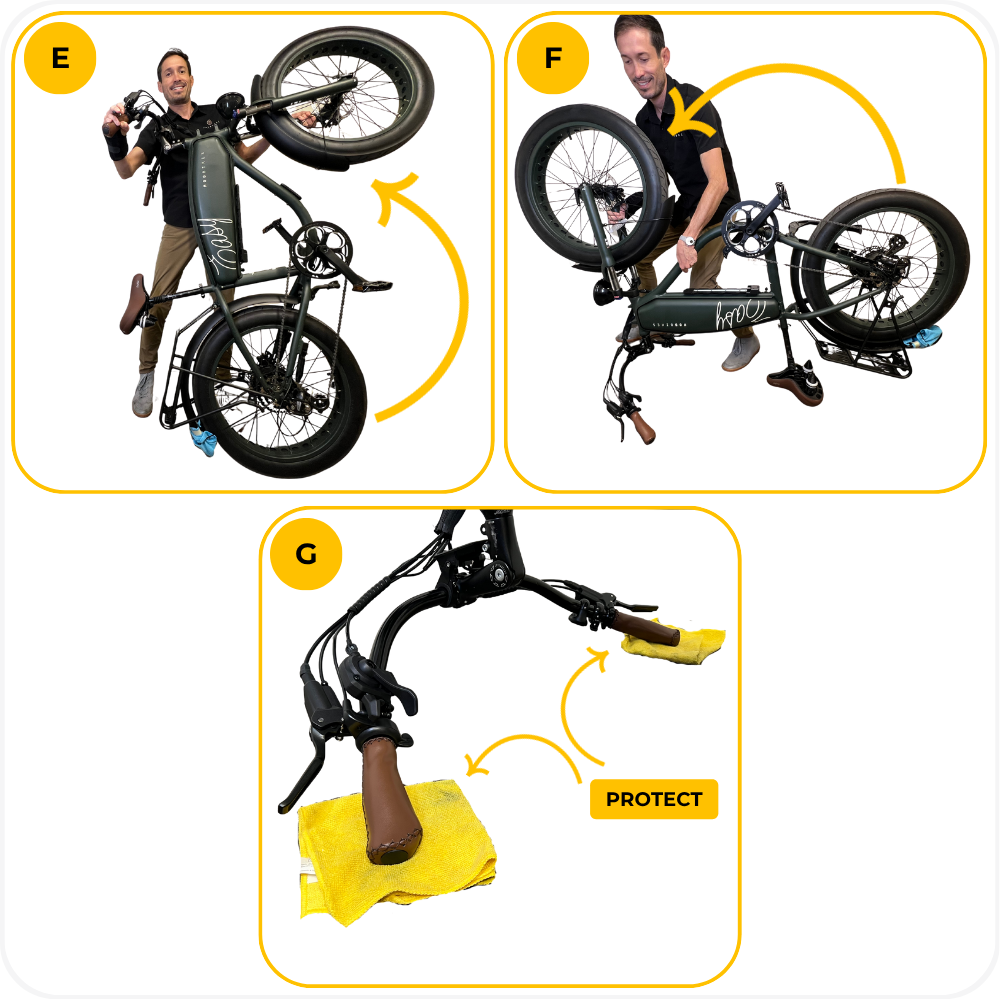
Place two rags or towels under the grips to protect the handles from scratches.
Note: Do not flip the bike upside down directly on the display or throttle.
The following instructions are divided into two sections:
A – Front Wheel and B – Rear Wheel.
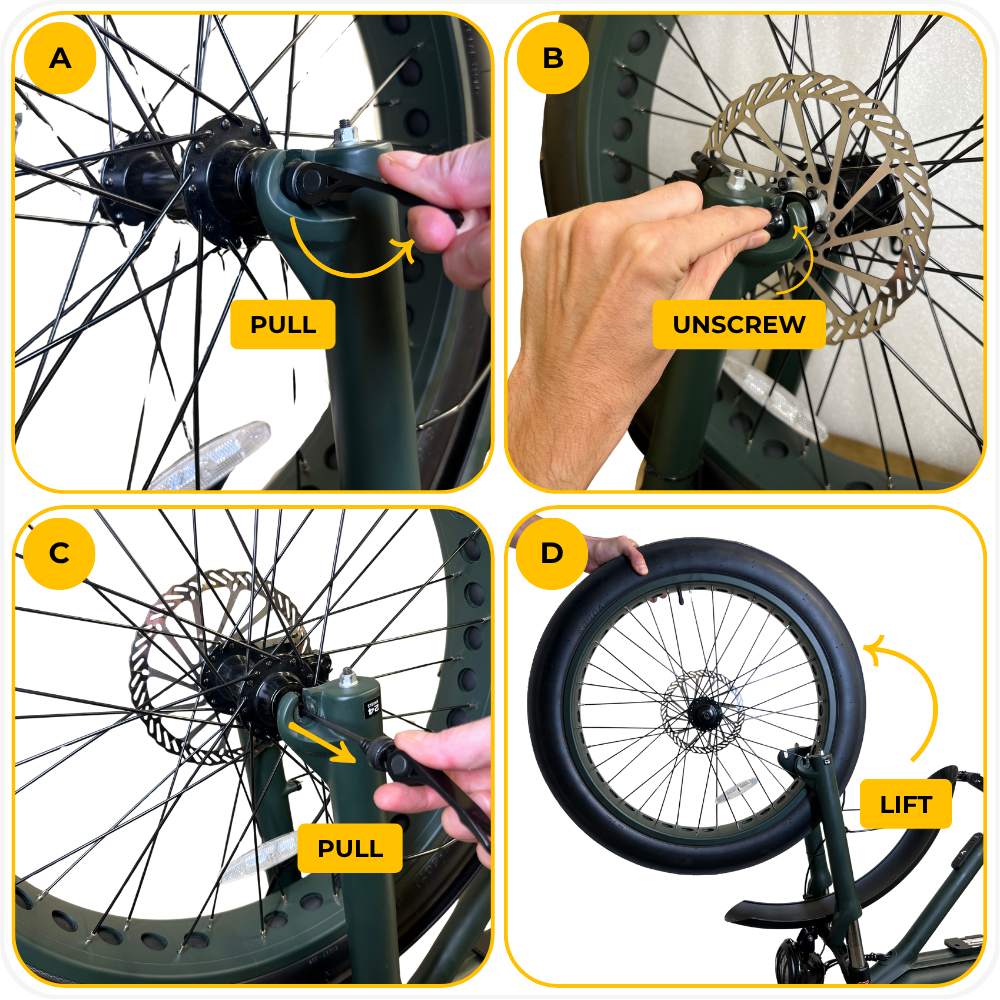
Step 2A: Remove the Front Wheel
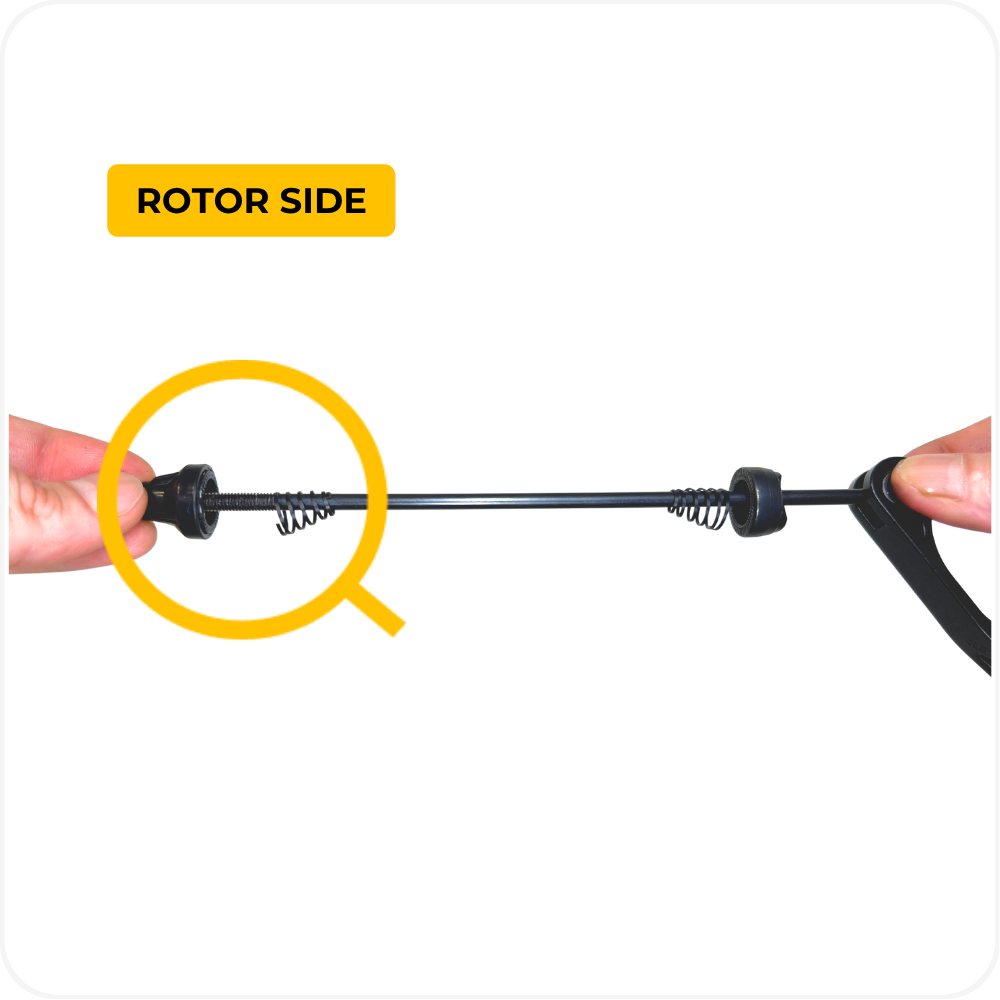
Pull the quick-release lever outward to unlock it from the fork. This releases the tension holding the axle in place.
With the lever open, turn the nut on the opposite side counterclockwise to unscrew for the axle to slide out.
Slide the entire skewer out from the hub and set it aside in a safe spot. Keep the springs and nut together so they don’t get lost.
Gently lift the wheel upward to release it from the fork dropouts.
Note: Ensure the front brake lever is released so the brake pads don’t press against the rotor.
Step 2B: Prepare for Rear Wheel Removal
- Move the kickstand fully outward to create space and improve access to the motor connector and axle area.
- Locate the motor’s Julet connector near the chainstay. Cut the three zip ties securing the cable, then firmly grip both sides of the connector and pull straight apart — do not twist, as this can damage the internal pins.
- Remove the rubber covers from each axle end to expose the nuts for removal.

Step 3B: Remove the Brake Caliper
Using your Multitool Allen wrench, remove the two bolts securing the brake caliper to the frame. Keep the bolts in a bolt tray for reinstallation later.
Gently slide the brake caliper over the chainstay and rest it against the frame. This prevents the rotor from bending or scratching during wheel removal.


Step 4B: Remove the Rear Wheel
On the drive side (where the chain and derailleur are located), use a 21 mm socket wrench (for MOD Easy) to loosen and remove the axle nut by turning it counterclockwise. Then remove the derailleur guard (the black metal piece protecting the derailleur) and place both parts in your bolt tray.
On the non-drive side, loosen and remove the axle nut and the washer beneath it. Set them safely aside in your bolt tray.
Using the palm of your hand, gently tap the top of the tire from one side, then the other, as shown in the photo below. A few light hits will help free the axle from the dropouts.
Pull the derailleur backward to create space and release tension on the chain, then lift the wheel upward, wiggling it gently side to side until the axle clears the dropouts.
Note: Keep all hardware and small parts together in a bolt tray so nothing gets lost during reassembly.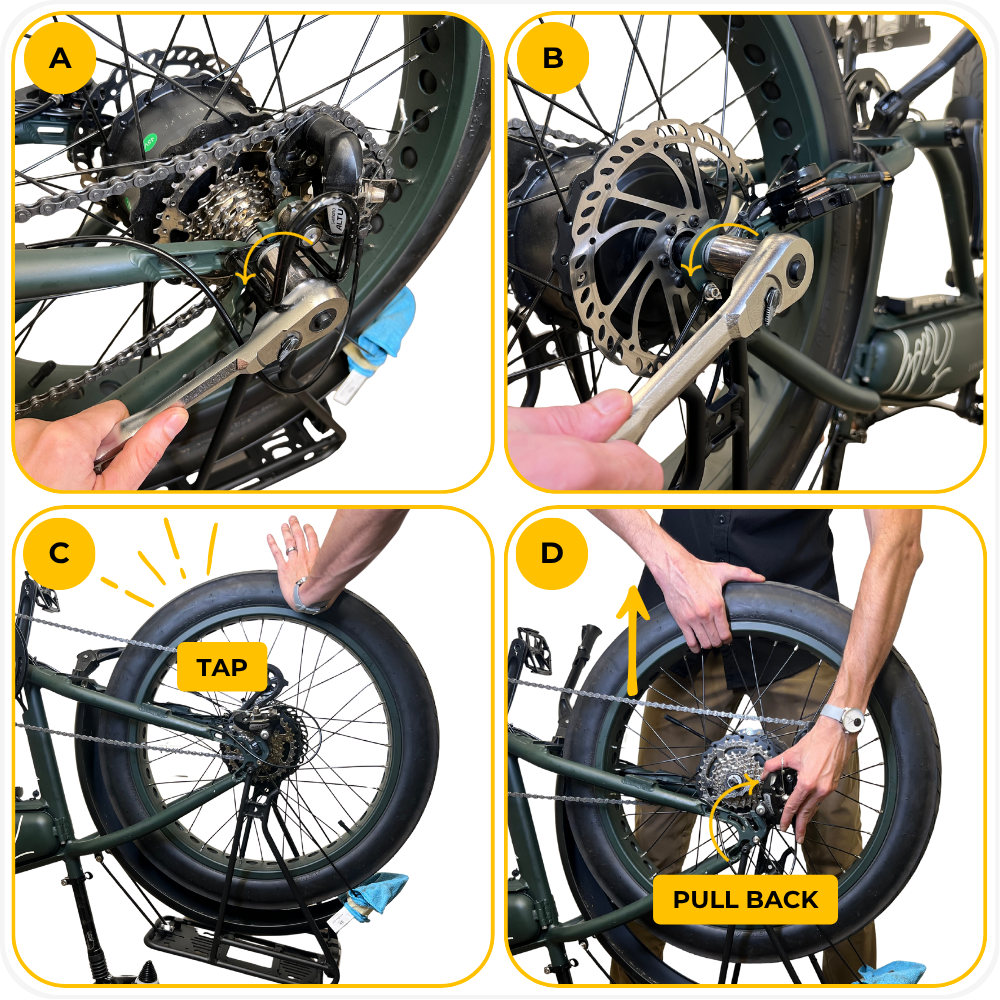
Step 5B: Check and Arrange Axle Washers
There are three pieces on the drivetrain side (right): two flat washers followed by one torque washer with a small metal tab. Sometimes your bike may have more than two regular flat washers - occasionally three - but they all go in the same place and follow the same sequence, always before the torque washer.
The two flat washers go onto the axle first, then the torque washer. Make sure the tab on the torque washer aligns with the dropout slot on the frame.
There is one piece on the rotor side (left): A torque washer. This prevents the axle from rotating under motor torque.
On the rotor side, install the single torque washer with its tab seated in the dropout slot, pointing in the same direction as the one on the drivetrain side.
Note: The tabbed washers are torque or anti-rotation washers. They keep the motor axle locked in place inside the frame. Keep all washers on the axle in the order shown or place them in your bolt tray immediately after removal. Losing or misplacing them can cause improper fitment or axle damage.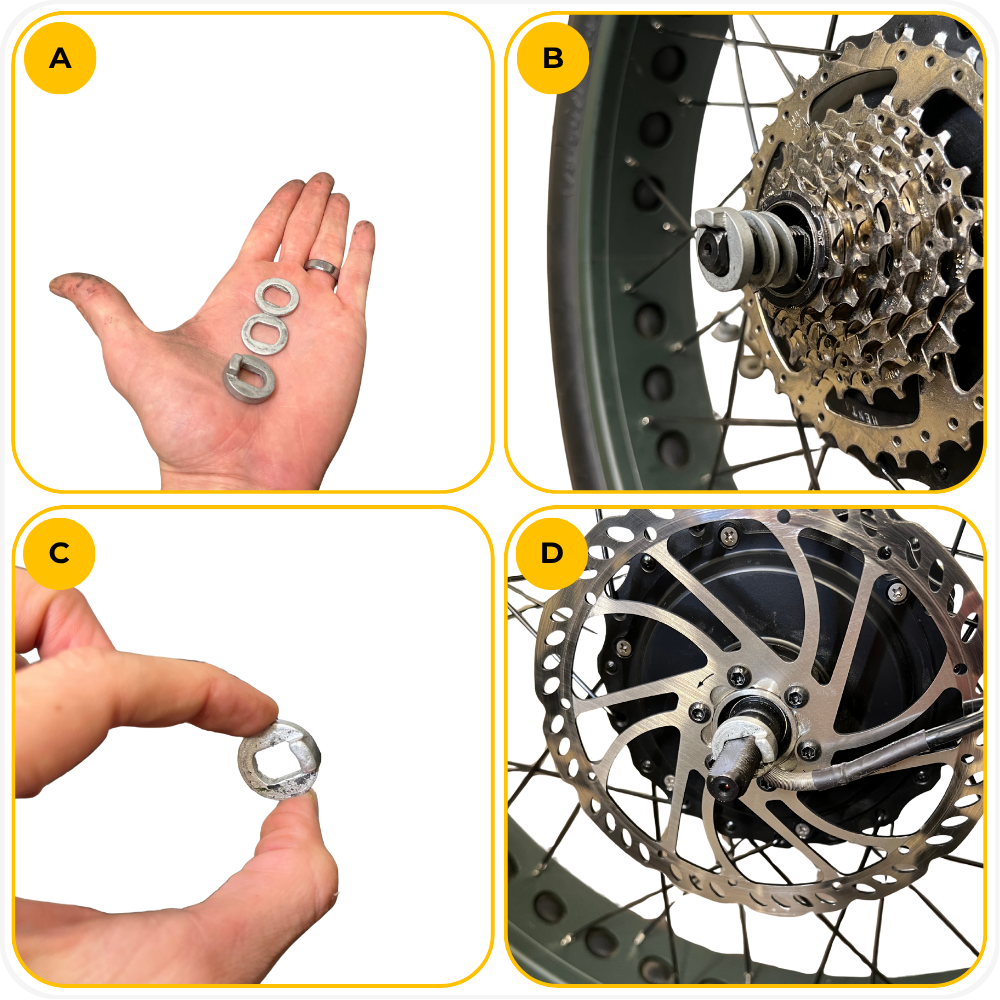
Note: If you removed your wheel to change a flat tire, follow these instructions: How to Change a Flat Tire
Steps to Remount Wheel
A → Front Wheel
B → Rear Wheel
Step 1A: Position the Wheel
Slide the wheel back into the fork dropouts, ensuring the axle is seated fully and evenly on both sides.
Insert the quick-release skewer through the hub, keeping the two springs in place on each side. The lever should be positioned on the side opposite the disc rotor to prevent interference with the brake system.
Thread the nut on the opposite side by turning it clockwise until it starts to tighten.
Close the quick-release lever firmly. The lever should leave a light imprint on your palm when properly secured. Spin the wheel to confirm it’s centered and moves freely without rubbing against the brake pads.
Warning: Make sure the disc rotor is on the same side as the brake caliper. Otherwise, your front brake will not function.

Step 1B: Remount the Rear Wheel
- Pull the derailleur backward to create space and release chain tension, then guide the wheel into place by sliding the axle down toward the dropouts.
- Make sure the torque washer and motor cable are pointing toward the front of the bike so the washer tab fits correctly into the dropout slot.
- Push the cassette in with your thumbs while slightly pulling the frame outward with your opposite hand to make room for the gears to slide between the chain and derailleur. Keep the torque washer tab aligned forward.
- Once the axle is seated, use a 10 mm wrench to gently wiggle the axle on both sides until it drops halfway into the dropouts.

Before tightening the axle nuts, the tire is centered within the frame. There should be an equal gap between the tire and each side of the frame or fender to ensure proper alignment and prevent rubbing while riding:

Step 2B: Secure and Reconnect Components
- On the drivetrain side, tighten the axle nut using a 21 mm wrench. Make sure the derailleur guard is positioned correctly over the derailleur, protecting it from impact.
- Move to the rotor side and tighten the opposite axle nut. Tighten both sides gradually and alternately—a little on one side, then the other—to keep the wheel centered before fully tightening.
- Reinstall the brake caliper and secure it with the two bolts using your multi-tool Allen wrench. Make sure the rotor spins freely between the brake pads.
- Reconnect the motor cable by aligning the arrows on the Julet plug and pressing straight together until fully seated. Replace the three zip ties you cut earlier to secure the cable, then trim the excess.
Note: Tightening both axle nuts evenly keeps the wheel straight and centered. Do not fully tighten one side before the other.

Step 3: Flip the Bike Back
- Place the rubber covers from each axle end back to protect the nuts.
Carefully lift and flip the bike upright, resting it on the kickstand. Check that both wheels spin freely and the bike is stable before riding.
Troubleshooting
Wheel rubs against the frame or fender → Loosen both axle nuts, realign the wheel so it’s centered between the frame arms, then retighten gradually and evenly on both sides.
Brake rotor scrapes or makes noise → Check that the caliper is centered and the rotor is seated properly between the pads. If rubbing continues, loosen the caliper bolts, squeeze the brake lever, and retighten while holding the lever.
Motor doesn’t engage after reinstalling the rear wheel → Ensure the motor’s Julet connector is fully seated and the arrows on both plugs are aligned.
Chain skips or falls off → Confirm the chain is correctly placed on the smallest cog when reinstalling the rear wheel and that the derailleur guard isn’t bent.
Wheel feels loose after tightening → Verify that all washers, including the torque washers, are installed in the correct order and that both tabs are seated in the dropout slots.
FAQs
Why is my rear wheel not centered after tightening?
One side may have been tightened before the other. Loosen both axle nuts slightly, center the wheel, and tighten both sides gradually and evenly.What happens if I install the torque washers backward?
Incorrect washer orientation can allow the axle to rotate inside the frame, which may damage the motor cable or dropout. Make sure both torque washer tabs point toward the front of the bike.Do I need to deflate the tires to remove or remount the wheels?
Not usually. Slightly deflating the tire can help if clearance is tight around the fenders or brake caliper.Can I ride if the brake rotor is rubbing slightly?
No. Even slight rubbing can cause premature wear or overheating. Adjust the caliper before riding.
Warning
⚠️ Important Safety & Liability Notice

These instructions are provided as a general guide for MOD BIKES products. Always make sure that all bolts, nuts, and quick-release skewers are properly tightened and secured before riding. Improper installation or insufficient tightening can cause the wheel to detach while riding, leading to serious injury, damage, or loss.

MOD BIKES is not liable for any damage, injury, or loss resulting from incorrect installation, modification, or failure to follow these instructions.

If you are not confident performing these steps, seek assistance from a qualified MOD BIKES technician or authorized service provider. Always perform a complete safety check before riding to confirm both wheels are secure, brakes are functional, and the motor cable is properly connected.
Was this article helpful?
That’s Great!
Thank you for your feedback
Sorry! We couldn't be helpful
Thank you for your feedback
Feedback sent
We appreciate your effort and will try to fix the article